Tuesday, July 28, 2009

Watch my zucchini grow

Remember this big ol baby??


Some new ones are furiously growing in the garden:

That's the main plant, the one that is huge and takes up the expanse of, oh, I don't know, a couch

Here's the other plant, that thus far has produced NOTHING but all of a sudden has produced this beautiful looking zucchini.


Actually, by the looks of it we could pick these buddies now and eat them. But, the last monster zucchini was so bountiful and provided us with so many meals!! So they are growing while I am out of town. I told Mister Siren to pick them if they got too out of control. He's on tomato watch anyway since we caught an EVIL CARDINAL out there pecking away at the tomatoes every day.

For instance, with the zucchini, we grilled it with other vegetables
(by the way, this was only half the monster zucchini, just to let you know)
You may not be able to see it, but I use Emeril Lagasse's trick of inserting toothpicks in the onion slices before putting them on the grill, in order to keep them together better. He suggests putting the toothpicks into your onion before you slice it, and then slicing away, to make it easier. I have found this to be really useful.

Once I grilled up that zucchini and onions, I mixed it with leftover grilled corn
Remember that delicious post? Of course the corn I shaved off the cobb was unadulterated with crazy loco sauce or queso fresca.


So I shaved off the corn, mixed it up with the other veggies and leftover steak from the grill the night before.

At which point I began to make some tostadas. easy! You just cut tortillas into triangles, spray them with Pam, shove them into the oven at 400 degrees for about 4 minutes or something like that. Then put your veggies on your tostadas, sprinkle cheese on top, and pop them back in until the cheese melts.

This is a delicious and easy meal, and really fun to eat. What's more, it's really cheap and great to use leftovers in. But the best thing of all, is that it uses all the summer veggie flavors.

Another thing I love to do with fresh raw veggies (including the rest of my monster zucchini) is just chop them up, sprinkle them with salt and drizzle them with olive oil, and make them part of a fresh snack plate for dinner. We did this with some leftover steak, cherry tomatoes, olives, and cheese and crackers for dinner the next night and it was great.

So I can't wait until my two new little zucchini
give me a reason to come up with several more ways to stretch the bounty!

Saturday, July 18, 2009

Best tomato pasta

I love when food bloggers turn you on to their own favorite recipes and then those become your favorite recipes. I tend to favor really easy recipes since I do not have a lot of time for preparation these days. Before I worked strenuous weeks, I loved to make complicated rich dishes for myself and Mister Siren or anyone else who was around. Now, it's all about ease of prep, saving time, saving money, and deliciousness.

Plus, the numero uno rule in the summer: I LOVE TOMATOES. Last summer I ate a tomato every day for lunch, salted with olive oil. To round out my stomach and get me through the day, I'd eat a small serving of cottage cheese and maybe some avocado if I could find one. I think next year I will plant even more tomato plants b/c the yield from these is not quite enough for my daily lunch needs + our dinner needs.

But anyway, I digress. I found my new favorite recipe, which is coincidentally the favorite recipe of MattBites. The recipe is actually from Gourmet magazine several years ago but based on Matt's recommendation, I have now fallen in love with it and will probably be making it for the next several years as often as possible.

Capellini With Fresh Tomato Sauce:

  • 1 small garlic clove
  • 3 lb tomatoes
  • 2 tablespoons fresh lemon juice
  • 1 teaspoon salt
  • 1 teaspoon sugar (optional)
  • 1/2 teaspoon black pepper
  • 1 lb dried capellini (angel-hair pasta)
  • 1/2 cup chopped fresh basil
  • Accompaniments:

    finely grated Parmigiano-Reggiano; extra-virgin olive oil for drizzling (optional)
  • Mince garlic and mash to a paste with a pinch of salt using a large heavy knife.
  • Core and coarsely chop two thirds of tomatoes. Halve remaining tomatoes crosswise, then rub cut sides of tomatoes against large holes of a box grater set in a large bowl, reserving pulp and discarding skin. Toss pulp with chopped tomatoes, garlic paste, lemon juice, salt, sugar (if using), and pepper. Let stand until ready to use, at least 10 minutes.
  • While tomatoes stand, cook pasta in a 6- to 8-quart pot of boiling salted water, uncovered, until al dente, about 2 minutes. Drain in a colander and immediately add to tomato mixture, tossing to combine. Sprinkle with basil.
The photo above is credited to Gourmet Magazine.

You can also go to MattBites.com and see his beautiful, perfect version.


Now, when I made this with juicy, delicious tomatoes from my garden (heh heh, don't you wish you had some?) i had more fun than I ever thought I would, grating tomatoes. Who would have thought the act of grating tomatoes would bring so much pleasure?
Once you grate and chop all of the tomatoes, you have a big bowl of pulp and chopped pieces.


And it says only one clove of garlic but I am very disobedient when it comes to garlic. Fresh basil from the garden, too - and the basil, by the way, is not looking too good these days. It is really flowering and I am going to have to raze it to the ground and just make pesto and freeze it soon. :( It's the most common thing I use!

I made the mistake of cooking the pasta first and then making this sauce, so then I had to wait the required 10 minimum minutes for the sauce to gel . . . I could barely make it.


I was very excited for the last 16 seconds.

Here is my finished product.

I love this china dearly. It is my grandmother's and was passed down to my mom and then to me. I realize though that it is not well suited to food photos. I need some white serving pieces to photograph from.

That aside, this dish makes me drool. We use whole grain pasta which has a distinctive taste and makes it even better. Basically, we were fighting over the leftovers the next day.

File this under YUM.

Tuesday, July 14, 2009

Everyone loves tomatoes

yep. it's true. I do. You do.

and so do the fauna out in the yard.

case in point:
something got this one good.

and the other side?
even the little hidden baby ones are not safe:


i don't know who, or what, is killing my tomatoes:

but you have to be VERY vigilant in the garden

Monday, July 13, 2009

Monster Zucchini

Skippy's vegetable garden is showing her first zucchini.

I remember way back when when I was asking Maybelline tips for how to grow my own zucchini (she is in Bakersfield and it just seems like food leaps out of the ground onto your plate from her garden . . . she already has so many tomatoes she had to start canning!)

I have my first zucchini, too!

WHOA! WHERE DID THAT COME FROM? it's over a foot long.

Well, it started with the beautiful zucchini squash blossoms. Some people like to fry them up and eat them. It's kind of a pain in the butt so I haven't done that yet. There are a million of them, though, so if i was inclined, i could. Actually it's the most copious thing in the garden.


There are two kinds of squash blossoms, female and male. I posted about this previously, but it bears repeating, especially now that I have so much photographic illustrative evidence. The way you can tell the difference is: the male flowers are on top of skinny long stems, and the female flowers are on top of, well - nubs that are attached to the base of the plant, which will one day, if fertilized, turn into a zucchini.

Who does the fertilizing? Bees, and other insects, i guess. That's why if you are going to eat squash blossoms you need to check inside for bugs.

So, these are all male flowers.
You can tell by their long skinny stems.


And here is a female flower.


You can tell because it is attached to a nub that is close to the base of a plant. Know what that nub is?

It's a zucchini! I was as surprised as you. The flower on the top falls off and it just keeps growing and growing.

It becomes something like this:
Is this not crazy? nature is weird and very cool.

Now, what would happen to female flowers when they are not fertilized? Unfortunately, the nub just withers up and never becomes a zucchini - a wasted chance for the plant to produce a valuable vegetable. Sometimes it takes days for the flower to fall off. It's pretty sad, too. Especially when you are waiting and waiting for your plant to produce another zucchini and you have six or seven male flowers, waiting to fertilize another female flower.

Like this. Argh. Why won't you grow? It's all limp and flexible, and then a day or two after this photo, it was completely withered and dried out.

Well, anyway, this zucchini just kept growing and growing

ANd i didn't really know what I should do - pick it at a certain size, or what? Also, i didn't know how to pick it, which is a stupid question, really, but it's true.

Then one day we came out and this monster was just laying on the ground. It was so huge and heavy it made my husband feel inadequate just looking at it. It probably doesn't even taste good. I HAD to pick it, so i just lifted it up and lightly twisted the base, and it came right off.

Can't wait to grill this sucker up and use it with the leftover grilled corn and steak on some tostadas!

Sunday, July 12, 2009

WOW! Best Grilled Corn

This summer Gourmet Magazine had a huge feature in their issue about grilling that talked about El Salvadoran-style grilled corn. The trick is that you smear the grilled corn with "crazy-loco" sauce (yes i know that is redundant), something different than the butter we usually use.

I was enthralled when I read this b/c I have to confess I am not a huge fan of corn on the cob. It gets stuck in my teeth. It's messy and not pretty and it really does not taste that good. So smearing a delicious sauce on the corn that is probably pretty fattening only made it sound more appetizing to me.

Then, on one of my favorite blogs, The Kitchen Witch posted about making Mexican-style grilled corn, and the recipe she researched was almost precisely the same as Gourmet's El Salvadoran recipe. Same premise, just a slight change in the ingredients.

The main difference between these two recipes is that the El Salvadoran recipe calls for mustard as part of the crazy-loco sauce, and has optional ketcup. The Mexican recipe calls for no mustard or optional ketchup but instead calls for sour cream, and also cilantro (which I did not use.)

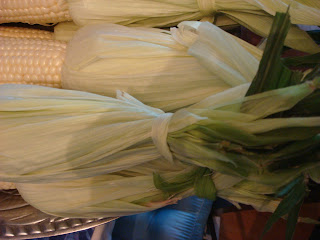
I started off prepping the corn as shown in the vivid photo spread in Gourmet. How can you resist glamorous presentation?
Mister Siren was put to work preparing these ears of corn. You peel the leaves down, remove the inner cornsilk (which is kind of a pain), and then use one of the leaves to tie leaves together. These tied-up husks serve no purpose except to act as a pretty handle. I love it!

Here is a closeup of how you do that:

Now thankfully, The Kitchen Witch's post reminded me that you must soak the corn for a good amount of time before you stick them on the grill, so that they do not dry up and burn when you have them on there. I did so. She said do it for 25 minutes. . . . Our grill was already ready for steaks and we were holding up the process, so I got about 7 minutes of soaking done.

But man, I think that made all the difference! The corn, when it came off the grill, was so much sweeter, more tender, juicier than any corn I have had on the cob before! I don't know if my family has just failed to soak their corn before. If you have not been doing so, try it. Maybe I AM crazy-loco, but this corn was out of this world, and I just had some other corn on the cob last weekend for 4th of July, too.

So anyway, then after you grill it and it's all tender (about 10 minutes or more), you take it off and spread this sauce on it.

My sauce was sort of made like this:
1/2 cup mayo (used light mayo)
1/2 dijon mustard
8 oz light sour cream

As I said, you can look at Kitchen Witches and Gourmet's recipes for the true sauces, and then adjust.

THEN, the important part is, you crumble this cheese called Queso Blanco on top of it . . . I thought this was probably the same thing as Queso Fresco but it is actually different, or at least it is sold in a different package and labeled differently, and thank God it is sold at Costco, b/c I had little time to shop today.


You "put a hefty squeeze of lime" on it, and a sprinkle of cayenne pepper if you want it. I couldn't stop eating it! I'm a total convert!

Corn has many fans, and the handle comes in handy, although not everyone loves the sauce and the cheese:

Salad Nicoise

So, what do you do with a handful of green beans?


I've learned a lot about planting green beans (and peas for that matter). First of all, I need to do rotated crop plantings (planting a new row every week or two so that I have enough green beans produced all summer.) Because we LOVE green beans. One of the things I remember most fondly as a child is that, over at my best friend's house, her mom had planted low bushes of green beans, and when we were out playing all day (locked out of the house! go play! don't come in!) we would swoop by these bushes every few hours and snap off some beans and pop them in our mouth. They were so good. And the bushes seemed to produce many beans per bush.

That was kind of what I was expecting from the beans I planted. Well, a), the beans were definitely one of the most hardy plants in the garden, but b) they weren't the variety I thought I had planted. Not the best friend's mom variety, anyway. They grew much taller and were not as bushy. You've seen the photos in previous posts. c) they produced great beans, but only about three per plant total, and these came in sporadically, so in all, i got a handful at first, then a second handful, then just a few more. I don't know if I'll get any more this season, maybe so.

Still, what to do with a handful of green beans? This same question has faced the author of a great and funny blog, "Gardening Without Skills," whose okra is really taking off and presents her with several okra every couple of days. Like me, she wonders, what do I do with a couple of okra every couple of days?

Since I have tomatoes and lots of lettuce in the garden, the answer was given to me by another great blog, (Simply Recipes), and I think is a great solution for using whatever handfuls you have around after harvesting your garden! Salad Nicoise! As the author of "Simply Recipes" relates, this French salad, when served in France, is composed of anchovies, raw vegetables, yadda yadda yadda. She suggests that you serve it with tuna steaks carefully marinated and seared, a nicely homemade herbed vinaigrette, and a bunch of other delicious stuff.

Here is hers:

Ingredients

Vinaigrette
1/2 cup lemon juice
3/4 cup extra-virgin olive oil
1 medium shallot, minced
1 Tbsp minced fresh thyme leaves
2 Tbsp minced fresh basil leaves
2 teaspoons minced fresh oregano leaves
1 teaspoon Dijon mustard
Salt and freshly ground black pepper

Salad
2 grilled or otherwise cooked tuna steaks* (8 oz each) or 2-3 cans of tuna
6 hard boiled eggs, peeled and either halved or quartered
10 small new red potatoes (each about 2 inches in diameter, about 1 1/4 pounds total), each potato scrubbed and quartered
Salt and freshly ground black pepper
2 medium heads Boston lettuce or butter lettuce, leaves washed, dried, and torn into bite-sized pieces
3 small ripe tomatoes, cored and cut into eighths
1 small red onion, sliced very thin
8 ounces green beans, stem ends trimmed and each bean halved crosswise
1/4 cup niçoise olives
2 Tbsp capers, rinsed and/or several anchovies (optional)

Method

*Marinate tuna steaks in a little olive oil for an hour. Heat a large skillet on medium high heat, or place on a hot grill. Cook the steaks 2 to 3 minutes on each side until cooked through.

1 Whisk lemon juice, oil, shallot, thyme, basil, oregano, and mustard in medium bowl; season to taste with salt and pepper and set aside.

2 Bring potatoes and 4 quarts cold water to boil in a large pot. Add 1 tablespoon salt and cook until potatoes are tender, 5 to 8 minutes. Transfer potatoes to a medium bowl with a slotted spoon (do not discard boiling water). Toss warm potatoes with 1/4 cup vinaigrette; set aside.

3 While potatoes are cooking, toss lettuce with 1/4 cup vinaigrette in large bowl until coated. Arrange bed of lettuce on a serving platter (I used two serving platters, shown in the photos). Cut tuna into 1/2-inch thick slices, coat with vinaigrette. Mound tuna in center of lettuce. Toss tomatoes, red onion, 3 tablespoons vinaigrette, and salt and pepper to taste in bowl; arrange tomato-onion mixture on the lettuce bed. Arrange reserved potatoes in a mound at edge of lettuce bed.

4 Return water to boil; add 1 tablespoon salt and green beans. Cook until tender but crisp, 3 to 5 minutes. Drain beans, transfer to reserved ice water, and let stand until just cool, about 30 seconds; dry beans well. Toss beans, 3 tablespoons vinaigrette, and salt and pepper to taste; arrange in a mound at edge of lettuce bed.

5 Arrange hard boiled eggs, olives, and anchovies (if using) in mounds on the lettuce bed. Drizzle eggs with remaining 2 tablespoons dressing, sprinkle entire salad with capers (if using), and serve immediately.

salad-nicoise2.jpg

Serves 6.

For mine, I used green beans from the garden, pictured here:

I used a delicious tomato from the garden, pitted against a tomato from the store. We did a taste test of the garden tomato from the store tomato, and although the store tomato had a great amount of wonderful tomato scent, when you bit into it after biting into the garden tomato - it tasted like , uh, shredded wheat. Which is sad, considering how great tomatoes from the store usually taste to me. WHY do tomatoes grown in my own yard taste 50000000 times better than the ones I buy in the store? Why can't they taste the same? It makes me sad.

Anyway, all i can say is that I am pretty happy I am growing my own tomatoes and I wish I had several more reliably producing plants.

In addition to the tomato and the green beans, I used greens from the garden, as usual.

I loosely followed the blog's recipe for the vinaigrette, but I did not use fresh lemon juice b/c unfortunately, lemons are no longer 3 for a $1.00 like they were three years ago, and I have never been able to get over the hike in prices on citrus. Or maybe I never will be able to. I lived in FL until I was about 12 and I just think that citrus should be cheap, period. You should certainly not be paying $0.98 for a lemon or a lime, and I won't do it. I'll buy the bottled stuff which is just as good. In my opinion.

So, i used that for the vinaigrette, and I kind of cheated on the herbs - I used basil and tarragon, b/c that is what I have in the garden (no oregano, no thyme . . . . maybe next year I'll start growing those). I love how the hot potatoes soak up the vinaigrette. Oh, and I did not pour out the potatoes and then restart the water for the 12 beans I had. I just threw them into the last minute of the boiling potatoes. It worked just fine.

I put down all of my greens, sort of found whatever was in the cabinets that I could use, and assembled it on a plate . . . . I think this entire salad probably came to $7.00 for two people between the cost of the olives, potatoes, eggs, capers (all of which I had laying around, but let's say you had to buy them . . . ) ANd I bought a $4.50 can of albacore tuna to make it fancy - which, I think they are cutting corners on the solid albacore b/c it looked like chunk light tuna when I opened it and I was pretty mad.

But anyway.

VOILA.

I could not finish mine and Mr. Siren had to polish it all off for me. Thankfully we went out dancing and I worked it off. I think this is a great meal for several reasons:
1) you can use whatever handfuls of stuff you have from the garden
2) It's pretty darn economical
3) it's packed with protein and really healthy, and also has the added bonus of being no-carb.

Thanks, Simply Recipes!

Saturday, July 11, 2009

Mr. Stripey Produces!

This darn plant has FINALLY begun looking up. Well, why not, it's almost ten feet tall, and it's mid-July now.

I received several pieces of advice on some gardening forums about the issues I have been having with Mr. Stripey. As I have mentioned on this blog before, this particular variety of tomato is notorious for either under-producing, getting leafy and big, or being light on flavor for the fruits it does produce. Now, it seems like the plants you put in the soil, etc., do really well, but only people in certain areas have the right conditions.

Anyway, we've seen the photos of the plant getting taller and taller:
(it's even taller now)

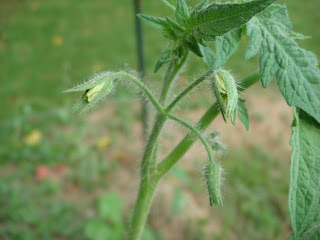
And it kept producing these flowers that were really non-flowers. See Exhibit A:
They would open up, and contain no petals, no stamen, no . . . . (what's the opposite of stamen? Pistol? i think there is another name. I think pistol and stamen are on the male flower? Uh oh, i think i am getting this entire flower anatomy thing wrong)

Part of the advice I received was that there was either a phosphorous deficiency or some other kind of deficiency that I cannot remember right now. Everyone agreed that the plant did not need any more nitrogen, because more nitrogen (such as is contained in Miracle-Gro) only makes your plants grow bigger and grow more leaves, etc. - NOT the problem this plant has. We needed this plant to STOP growing and start producing fruit.

I also was told to stop watering so much. The plants were a bit overwatered because of constant rain. I think this did make a big difference for this plant and the other tomato plants.

However, the biggest difference, I think, was made by:
Go Schultz!

Look what happened less than three days after I used Schultz!
REAL flowers started appearing, the kind with petals! I was totally biting my nails while waiting to see if they would turn into full fledged beautiful flowers.

And they did:

I picked the Schultz fertilizer b/c it had the lowest content of nitrogen, and the highest of phosphorous, and the plant really seemed to respond to it - very quickly. I have not seen any other flowers on Mr. Stripey, though. I have seen more non-flowers. I am hoping that it bears some more fruit.

In response to this flowering, I have gone at the rest of the plant and mercilessly pruned it, as per the pruning instructions I posted previously. Remember, you can prune all branches below the first flower cluster . . . I didn't do that much, but there really is just too much greenery on this monster taking the nutrients out of the soil, and away from fruit production.

Here is Mr. Stripey now:

And the next flower cluster produced:
I think this is destined to be a non-fruit bearing flower cluster. See here:

It's weird and I don't understand it, but there it is.

Well, I can't wait to see these tomatoes when they finally ripen! Because the plant is so tall, and that tall branch was not caged, the weight of the new fruit has weighed it down and I bet they are almost going to be laying on the ground soon. I'll have to find some way to support the branches so that does not happen.

Let's all raise our glass to Mr. Stripey!